Step By Step Guide For Installing Cricket Net
Selecting the Location For Cricket Practice Net
Choosing the proper vicinity to install your cricket net is important for ensuring it’s secure and works properly. You need to discover a sizeable sufficient place or region where the net can fit conveniently. Additionally, this space needs to have more room around it so gamers can pass around appropriately and play without any trouble.
The area should be secure, meaning there must be no dangers like overhead power lines, roads close by, or steep slopes. It’s great to pick out a flat, open space. If you can, discover a spot with grass because it’s softer and safer if someone falls. If there is no grass, ensure the floor is even and solid.
Also, consider wherein the solar is all through the day. You do not want gamers to investigate the bright solar even as they’re playing, as it may be distracting and make it hard to see the ball.
Make sure the spot you pick is straightforward so that you can communicate with the cricket net and different systems without too much hassle. However, it needs to additionally be a piece far from bustling areas so that you won’t be disturbed at the same time as gambling.
Considering all this stuff, you may discover a spot for your cricket net where you could practise adequately and have a number of laughs playing cricket.
After selection of space if you have cricket net already purchased than well and good . If you want to buy cricket net for installation you can check our collections of cricket nets and get the customised net as per your need . If our predefined sized net does not fit your requirement. Checkout Netskart.
Inspecting the Structure For Installing Cricket Practice Net
Before you install your cricket net, it’s very vital to test the structure in which you may install the net. You want to ensure this shape is robust enough to preserve the net properly. The net will be heavy and pull on the structure because the cricket balls will hit it, and the wind might blow towards it.
You have to look at the poles, walls, or frames you plan to connect to the net. These ought to be strong and not broken. If there are any cracks or rust . We recommend you not to use that structure go for the new structure which is good in conditions
If you find something vulnerable or broken, you want to restore these issues earlier than you grasp up the net. This is crucial because it ensures that the net may not collapse or cause any accidents as soon as it is up. The sturdy and strong shape will keep the net steady and secure your cricket practice region for you and your buddies to play.
Gathering Equipment and Materials
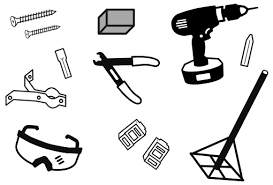
Before setting up your cricket net, you need to acquire all the necessary gadgets and materials. First, ensure you have got the cricket net itself. Check that it is the right size for where you need to position it. You may even want help poles. These poles preserve the net and ought to be strong and at the proper top to create an awesome space for playing.
Next, you want hooks that attach the net to the poles and ropes or cables to tie everything together tightly. These help preserve the net stretched out and within the proper vicinity. You’ll also need a few gears to place the whole lot together, like hammers, wrenches, or screwdrivers, depending on the way you want to bring together your setup.
Make sure you have got all this stuff geared up before you start. This will assist you in positioning your cricket net easily and speedily. By having all the materials and gear you want organised beforehand, you may make sure your cricket practice place is installed appropriately and successfully so it’s prepared for you to use.
Assembling the Support Structure
If the area in which you need to set up your cricket net doesn’t already have poles or beams, you will need to position them collectively. As per the requirement. When you’re putting in the poles so one can hold your net, it’s very vital to make certain the whole thing is prepared tightly and efficiently. If the poles want to stand at the ground, they must be sincerely well constant into the ground. This would possibly mean you have to dig a few holes and use concrete or unique ground stakes to make sure the poles are sturdy and receive it shake or fall over. If you want to attach the poles to something that’s already there, like a wall, make sure you do it very securely using the right gear and attachments.
Doing all this the proper way will help keep your cricket net safe and steady so that you can practise your cricket skills without any worries.
Attaching Hooks or Brackets
Once you’ve got geared up your assist shape, the following step is to put hooks or brackets alongside the pinnacle of the form. These hooks or brackets will maintain the pinnacle fringe of your cricket net. It’s crucial to vicinity them at equal distances from each other simply so the net stretches lightly and remains balanced.
Start by measuring the length of the top of your form and plan in which each hook or bracket desires to go. This guarantees that they may be spaced out flippantly. After making plans for their positions, attach each hook or bracket firmly to the shape. You can use screws or bolts to ensure they’re in reality solid.
Make sure every hook or bracket is tightly mounted to the structure. They want to be robust sufficient to hold the net, specially whilst it’s windy or whilst the cricket balls hit the net difficult. Properly connected hooks or brackets will keep your cricket net stable and steady for every person to use.
Unrolling the Net
Once you have the hooks or brackets set up for your structure, the subsequent issue to do is to unroll the cricket net. Make certain you do this carefully so the net doesn’t get tangled or damaged. First, lay the net flat on the ground to straighten it out, then pick it up and gently surround it in opposition to the shape in which it will grasp.
It’s absolutely critical to make certain the net strains up effectively with the shape. The pinnacle edge of the net needs to be despite the hooks or brackets you placed up. This enables the net to dangle directly and cover the location it is imagined to.
After lining up the net, attach it to the hooks or brackets. As you do this, pull the net tight to make certain there aren’t any unfastened elements. A tight net is good as it won’t sag or come free, this means that it may take care of being hit with the aid of cricket balls better. Making certain your cricket net is stretched tightly and flippantly will help make your practice area better and safer to apply.
Attaching the Net
After placing the cricket net against the structure, it’s time to attach the top fringe of the net to the hooks or brackets you’ve put up. This step could be vital to ensure your net is securely held up and hangs efficiently.
To attach the net, you can use zip ties or clips. These are surely precise for ensuring the net stays in the region. Start attaching the net at one cease and then flow to the opposite give up, securing the net to every hook or bracket. When you connect the net, pull it to ensure it is tight and stretches evenly. This helps save you any unfastened components of the net that would motivate issues while you are gambling.
Make certain that the complete duration of the net is stretched frivolously. A stretched net appears nicer and works higher because it can catch the cricket balls properly. Ensuring the net is properly connected and tightly stretched creates a safe and beneficial practice area for your cricket games.
Securing the Bottom Edge
After you’ve connected the top of your cricket net, it’s crucial to steady the bottom side, too. This helps preserve the net from transferring around or flapping when it’s windy, which makes it more secure and better to apply.
You may use stakes or weights to hold the lowest edge of the net in the region. The stakes work nicely if you put up your net in a grassy or dirt place. You must push those stakes deep into the floor alongside the bottom of the net. Ensure every stake is deep enough to stay organised, even supposing the net gets pulled or while the wind blows hard.
If you’re putting in place the net on a difficult floor like concrete, in which you can’t use stakes, then you may use heavy weights alternatively. Place these weights lightly alongside the lowest edge of the net. This will keep the net down and prevent it from being transferred. This way, your cricket net will live in your location and be equipped with a good way to use it, irrespective of the climate.
Testing the Installation
After you have finished setting up your cricket net, it is important to ensure it is installed correctly and safely. To test the installation, gently push on different parts of the net. This will help you see if the net is stable and properly connected.
If the net wobbles or shifts when you push it, it might not be secure enough. When you go on the net, it should feel firm and not move around much. If you notice this, check the attachments, like the hooks, brackets, stakes, or weights. Make sure everything is tightly constant, and keep the net firmly in place.
This makes your practice time secure and fun, making you conscious of improving your cricket abilties. Doing this helps you ensure the net is secure to apply. A properly set up cricket net will live in the region when you hit cricket balls into it and it won’t come unfastened.
Inspecting for Safety
Look around the entire setup for any possible dangers, like sharp edges on the poles and hooks or parts that are not tight and could come loose. After you set up your cricket net, it’s very important to check that everything is safe before you start using it.
By taking the time to make these checks and fixes, you ensure the cricket net area is safe for everyone to use. If you see any sharp parts while checking, you can cover them with tape or soft padding to make them safe.
Having a safe setup means having fun practising your cricket skills without worrying about getting hurt. This makes practice time better and safer for everyone. This helps prevent scratches or injuries. Also, make sure to tighten any loose parts. This will help keep the net from coming undone while using it.
Finalizing
Once you are positive that everything is secure with your cricket net set-up, it’s time to finish up by making the area look neat. First, contend with any greater netting that is placed off the edges. You should carefully reduce this extra netting so that your cricket net looks tidy. Make sure to apply sharp scissors or a cutter, and it’s an amazing concept to have an adult assist you with this.
Next, smooth up around the structure wherein you installed the net. Pick up any equipment, leftover substances, or trash that is probably mendacity around from setting up the net. Cleaning up helps hold the place secure as it removes matters that a person ought to trip over.
By taking those final steps, you ensure that your cricket practice vicinity isn’t always the most effective and prepared to use but also easy and safe. Now, you can enjoy gambling cricket in an area that is prepared and looks proper.
Regular Maintenance
To hold your cricket net in proper shape and make sure it’s secure, you have to frequently take a look at it and the structure it hangs from for any signs and symptoms of wear and tear or damage. Over time, the net and aid structures like poles and hooks can start to reveal what has been put on from being used plenty or from climate change.
Every few weeks, take some time to cautiously appearance over your cricket net setup. Check the net for any holes, tears, or spots where it is probably coming aside. Also, look into the help poles, hooks, and brackets to see if they may be getting rusty or if they’re free. If you find any problems, it’s vital to repair them as quickly as possible. You might need to fix holes within the net, update components, or tighten the helps.
Doing these everyday checks and making any needed upkeep allows make certain that your cricket net is usually ready and safe for use. This way, you could keep playing your cricket exercise while not having to fear about protection.
Conclusion
In end, setting up a cricket net the proper manner is very essential if you want a secure and right place to practice cricket. By deciding on the right spot, checking that the shape is powerful, and gathering all the device you need, you could ensure that putting in place the net goes easily.
It’s very vital to observe every step cautiously, from setting collectively the aid shape to making sure the net is securely connected on the pinnacle and bottom. This enables make sure the net works properly and is safe to apply a lot.
Regularly checking the net and the matters retaining it up is prime to keeping it secure and in the proper circumstances. Fixing any small problems quickly allows avoid larger troubles later and keeps the net secure to apply. Also, making the place look neat by means of trimming extra netting and cleansing up after setting up adds to making the practice space first-rate and usable.
Remember, a cricket net that is well installation and taken care of no longer provides a secure place for players to get higher at their talents but additionally makes practice time extra effective by being dependable and regular. The paintings you put into setting up and searching after the net are worth it because they give you a dependable location to practice in which gamers can pay attention to improving their cricket without worrying about protection. Following those suggestions will help you enjoy an extraordinary cricket practice vicinity, which is both beneficial and secure for anybody.